
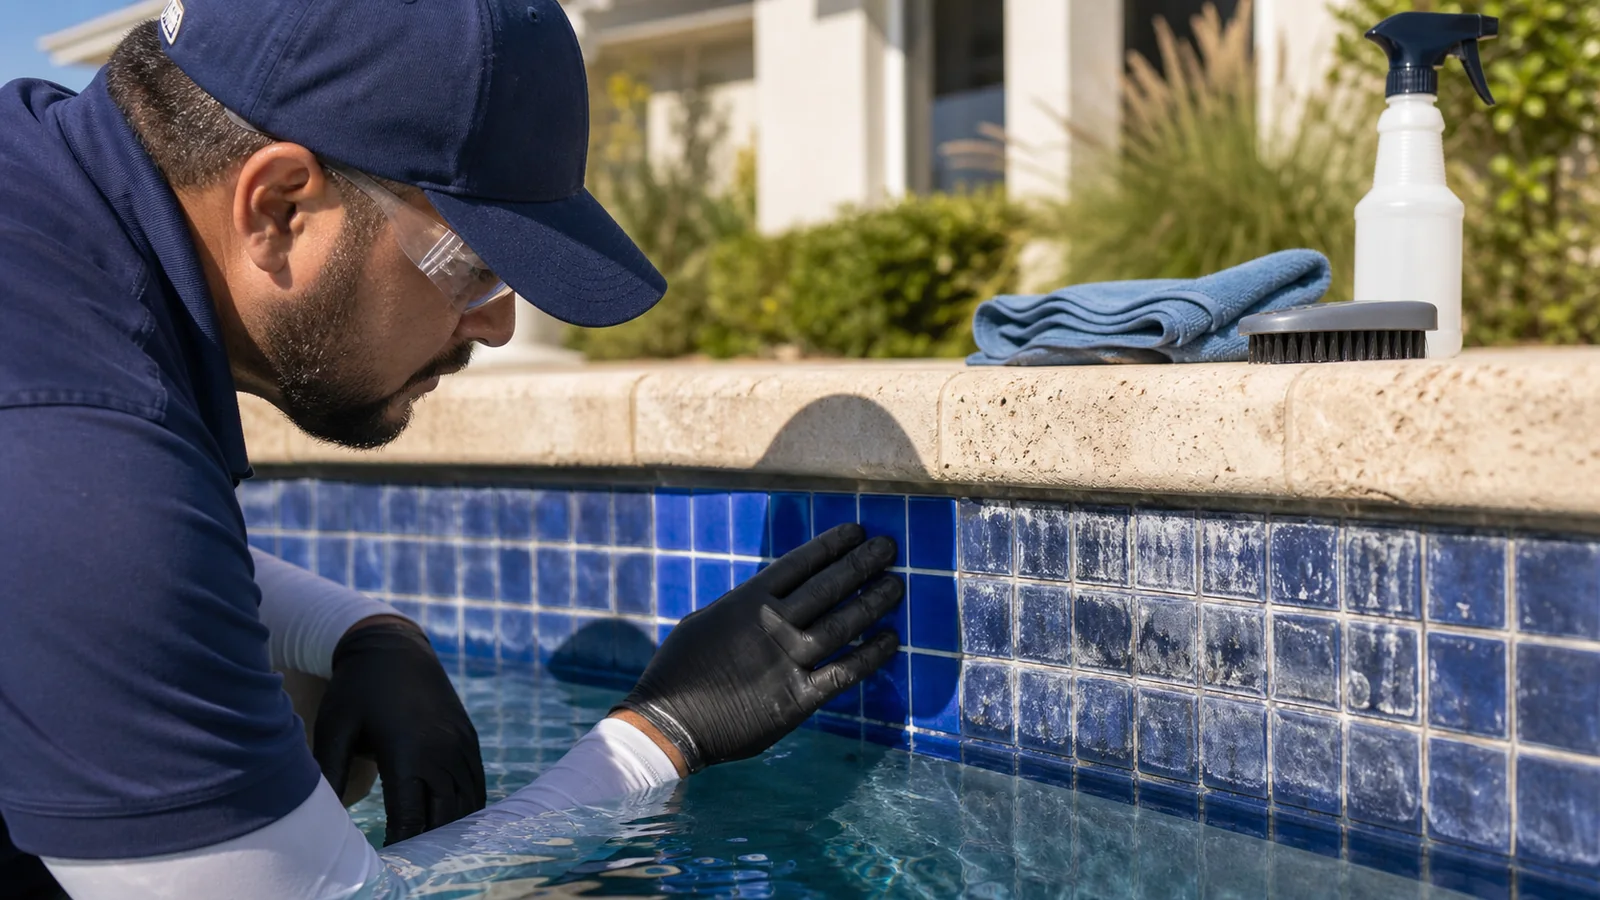
A rough white ring at the waterline is often calcium or other mineral scale left as water evaporates. Over time, it hardens, traps oils and dirt, and resists ordinary brushing.
Pool tile calcium removal is not simply a matter of applying more force. Tile, stone, grout, coping, and decorative finishes respond differently to abrasives and chemicals. Scale also varies. A controlled plan begins by identifying materials and testing an inconspicuous section.
What Causes the White Ring on Pool Tile?
Pool water contains dissolved minerals that evaporation leaves at the waterline. Repeated wetting and drying builds a crust, especially when water chemistry favors precipitation. Calcium carbonate is common, but appearance alone does not confirm the deposit.
Conditions that may encourage waterline buildup include:
- hard fill water or high calcium hardness;
- pH or total alkalinity outside the pool professional’s recommended range;
- warm temperatures and frequent evaporation;
- splash-out followed by drying on tile and coping;
- ongoing water-balance problems;
- sunscreen, body oils, and other residue that adheres to the mineral layer.
Deposits may be powdery, thick, ridged, or discolored. A white line can also be efflorescence, grout residue, a salt-system deposit, or material deterioration. If the source is uncertain or the pool is losing water, consult a pool-service professional rather than assuming routine scale. Older scale usually requires more effort, but even recent deposits should be treated according to manufacturer guidance.
Why Aggressive DIY Methods Can Be Risky
Pool owners often try abrasive pads, pumice, scrapers, or acid cleaners. These may remove some deposits but can leave permanent changes. Pumice accepted on one ceramic tile may scratch glass or a glossy finish; a blade can score decorative tile; spot scrubbing can create uneven sections.
An unsuitable acid concentration or dwell time can etch grout, stone, metals, or cementitious materials. Splash and runoff can affect coping, decking, plants, equipment, and pool chemistry. Mixing pool chemicals or cleaners can release dangerous gases; never combine products unless their labels and a qualified professional explicitly direct it.
Before attempting a DIY method, confirm all of the following:
- the tile or stone manufacturer permits the product and tool;
- grout and nearby materials are compatible;
- the area can be tested without creating a conspicuous mark;
- eyes, skin, lungs, landscaping, and equipment can be protected as directed;
- rinse water and residue can be managed correctly;
- the pool’s chemistry can be restored and verified afterward.
Stop if the finish becomes dull, scratched, pitted, or discolored. More pressure is not the answer to a poor reaction.
Tile Type and Condition Determine the Method
Ceramic and porcelain tile often has a durable glaze, but its condition, patterns, chips, and exposed edges matter. Glass can show scratching or changed sheen in sunlight. Textured tile collects scale in recesses and may clean unevenly.
Natural stone is not equivalent to manufactured tile. Acid-sensitive travertine or limestone can etch, and abrasion can alter texture or expose pores. Sealers, repairs, and weathering add uncertainty. Coping may differ from the waterline, so a method accepted for one should not automatically touch the other.
Grout condition can limit what is practical. Cracked, missing, soft, or eroded joints may need repair before cleaning. Loose tiles, hollow-sounding sections, failed sealant, or active leaks should be evaluated rather than hidden by a cosmetic treatment. Cleaning removes deposits; it does not repair bond failure or correct the water chemistry that produced scale.
A representative test patch should show more than whether scale disappears. Inspect the dry surface for scratches, gloss changes, exposed pores, grout erosion, and color variation before expanding the method.
How Professional Pool Tile Cleaning Is Planned
Professional cleaning is based on control: match the media, tool, chemistry, pressure, distance, and technique to the tile and deposit. Depending on the materials and service offered, a specialist may consider a compatible low-pressure abrasive process, mechanical treatment, a manufacturer-approved chemical process, or a combination. “Blasting” is not automatically appropriate for every pool finish.
An initial assessment should review:
1. tile, stone, grout, coping, and nearby deck materials; 2. scale thickness, hardness, coverage, and discoloration; 3. chips, cracks, loose tile, repairs, and sealant condition; 4. access around steps, corners, raised spas, and spillways; 5. pool-water level and equipment requirements; 6. protection for landscaping, glass, metals, drains, and finished surfaces; 7. how residue and wastewater will be collected and handled.
A small trial establishes the lowest effective approach and reveals the underlying finish. Heavy buildup may conceal wear or stains. Thick scale may require staged treatment; the scope should not promise complete removal without damage before testing.
If an abrasive method is considered, airborne material and rebound still require control. Introducing water can reduce airborne dust, but it does not make the work dust-free or eliminate the need for PPE, screens, housekeeping, and waste collection.
What to Expect During a Cleaning Visit
Before cleaning, confirm the scope, test area, access, utilities, and pool-service coordination. Water level may need adjustment, but do not drain a pool without qualified guidance; groundwater pressure and pool construction can make improper draining hazardous.
The crew protects coping, decking, stonework, glazing, equipment, landscaping, and other sensitive features as required. A controlled work zone keeps people and pets away from tools, residue, and wet walking surfaces. Drains and discharge routes receive protection appropriate to the cleaning process and local requirements.
Cleaning proceeds by section to keep the appearance consistent. Corners, grout lines, decorative elements, steps, and spa spillovers may require different technique from straight tile runs. The crew checks the dry or rinsed finish rather than judging through wet residue.
At completion, debris is collected, protections are removed, and the area is reviewed. A pool professional may need to verify and rebalance water before use. Cleaning cannot reverse scratches, etching, fading, damaged glaze, failing grout, or staining within porous material.
How to Keep Waterline Tile Cleaner Longer
Scale can return if evaporation and water chemistry continue feeding deposits. Maintenance cannot guarantee a scale-free waterline, but it can slow accumulation and make future cleaning less intensive.
- Have pH, total alkalinity, calcium hardness, and other relevant measures maintained within ranges appropriate for the pool and finish.
- Test source water when recurring hardness is a concern and ask a pool professional about suitable management options.
- Brush the waterline gently and regularly with a tool approved for the tile.
- Remove sunscreen and oil residue before it becomes embedded in a mineral layer.
- Address a thin deposit early rather than waiting for a thick crust.
- Inspect grout, sealant, coping, and tile periodically so repairs are not confused with cleaning needs.
- Avoid unapproved household cleaners that can alter water chemistry or damage pool materials.
Water chemistry guidance should come from a qualified pool professional familiar with the equipment, sanitizer, surface, and local water. Lowering calcium or changing pH without considering the entire system can create corrosion, etching, or other problems.
Information Needed for a Useful Estimate
Pricing and method selection depend on more than pool size. Linear feet of waterline, deposit thickness, tile sensitivity, access, raised features, nearby materials, and jobsite controls all affect the scope.
For an initial review, gather:
- two or three close, well-lit photos of typical and heaviest buildup;
- a wide photo showing the full pool edge and access route;
- approximate pool dimensions or waterline linear feet;
- tile, stone, coping, and grout information if known;
- notes about previous cleaners, sealers, repairs, or recurring deposits;
- the project address or ZIP code and preferred timeline.
Photos help screen the project, but they cannot always identify the tile or deposit. An on-site assessment and test area may be needed before defining expected results.
Frequently Asked Questions
Can calcium scale be removed without damaging tile?
Many deposits can be reduced or removed with a suitably controlled method, but no contractor should guarantee zero risk before identifying the finish and testing it. Existing wear and porous or acid-sensitive materials may limit the achievable result.
Is pumice safe for pool tile?
Not universally. Pumice may be used on certain compatible surfaces when kept wet and applied correctly, but it can scratch glass, glossy, decorative, or softer materials. Follow tile-manufacturer guidance and test an inconspicuous area first.
Will waterline cleaning keep the white ring from returning?
Cleaning removes existing deposits; it does not change the conditions that created them. Balanced water, routine brushing, oil removal, and early attention can slow recurrence. A pool professional should address persistent chemistry problems.
Does the pool need to be drained?
Not necessarily. The required water level depends on the cleaning method and access. Never drain a pool solely on general advice; improper draining can damage some pools. Coordinate with the cleaning and pool-service professionals.
Send Photos for a Project Review
Manases EcoBlast operates from Great Bend, Kansas, and Austin, Texas, serving projects across Kansas, Oklahoma, and Texas. To discuss pool tile calcium removal, email close-ups, a full-edge photo, approximate dimensions, tile information, location, and timeline to contact@manasesecoblast.com, or call 512-592-1288. The team can assess whether a test patch and controlled cleaning approach are appropriate for the pool materials and buildup.